
# Simple Integration Walkthrough
# Introduction
Ethereum transactions cost gas, which means your dapp’s users cannot initiate them unless they already have some ether. Onboarding new users into Ethereum is a problem. GSN provides a solution by allowing a different entity, either you or a third party, to pay for transactions.
In this article you learn how to accept transactions that are paid for by somebody other than the sender, how to sponsor transactions, and how to write a user interface that uses GSN.
# Converting a Contract to Support GSN
To accept transactions that are paid for by a separate entity you have to do several things:
- If necessary modify your configuration file (in truffle,
truffle.jsortruffle-config.js) to require Solidity version 0.6.10 or higher:module.exports = { networks: { ... }, compilers: { solc: { version: "^0.6.10" } } }; - Add
@opengsn/providerin the dependencies, version 2.2.0.npm install @opengsn/provider --save - Import the base contract, and inherit from it:
import "@opengsn/contracts/src/BaseRelayRecipient.sol"; contract MyContract is BaseRelayRecipient { ... } - Create a constructor that sets
trustedForwarderto the address of a trusted forwarder. The purpose is to have a tiny (and therefore easily audited) contract that proxies the relayed messages so a security audit of the GSN aware contract doesn’t require a security audit of the fullRelayHubcontract. You can look here to see the addresses to use on mainnet and various test networks. - Create a
versionRecipient()function to return the current version of the contract. - Replace
msg.senderin your code, and in any libraries your code uses, with_msgSender(). If you receive a normal Ethereum transaction (from another contract or external account that pays for its own gas), this value is identical tomsg.sender. If you receive an etherless transaction,_msgSender()gives you the correct sender whereasmsg.senderwould be the above forwarder.
# Example: CaptureTheFlag
As a demonstration, here is an extremely simple capture the flag game (opens new window) that, when called, captures the flag and emits an event with the old and new holders.
pragma solidity ^0.6.10;

// SPDX-License-Identifier: MIT OR Apache-2.0

import "@opengsn/contracts/src/BaseRelayRecipient.sol";

contract CaptureTheFlag is BaseRelayRecipient {
	string public override versionRecipient = "2.0.0";

	event FlagCaptured(address _from, address _to);

	address flagHolder = address(0);

        // Get the forwarder address for the network
        // you are using from
        // https://docs.opengsn.org/networks.html
	constructor(address _forwarder) public {
		trustedForwarder = _forwarder;
	}

	function captureFlag() external {
		address previous = flagHolder;

                // The real sender. If you are using GSN, this
                // is not the same as msg.sender.
		flagHolder = _msgSender();

		emit FlagCaptured(previous, flagHolder);
	}
}
# How does it Work?
Obviously, blockchain access is still not free. You get these GSN transactions with the help of two entities. The user's application talks to a relay server, one of a number of servers that offer to send messages into the chain. The relay then talks to a paymaster, a contract that decides which transactions to finance based on the sender, the target contract, and possibly additional information.
Paymasters are contracts, so they are always available, same as any other Ethereum contract. Relays are internet sites which get paid by paymasters for their services. Running a new relay is cheap and easy (see directions here). We expect that anybody who opens a dapp for relayed calls will also set up a relay or two, so there will be enough that they can't all be censored.
Note that everything the relays do is verified. They cannot cheat, and if a relay attempts to censor a client at most it can delay the message by a few seconds before the client selects to go through a different relay.
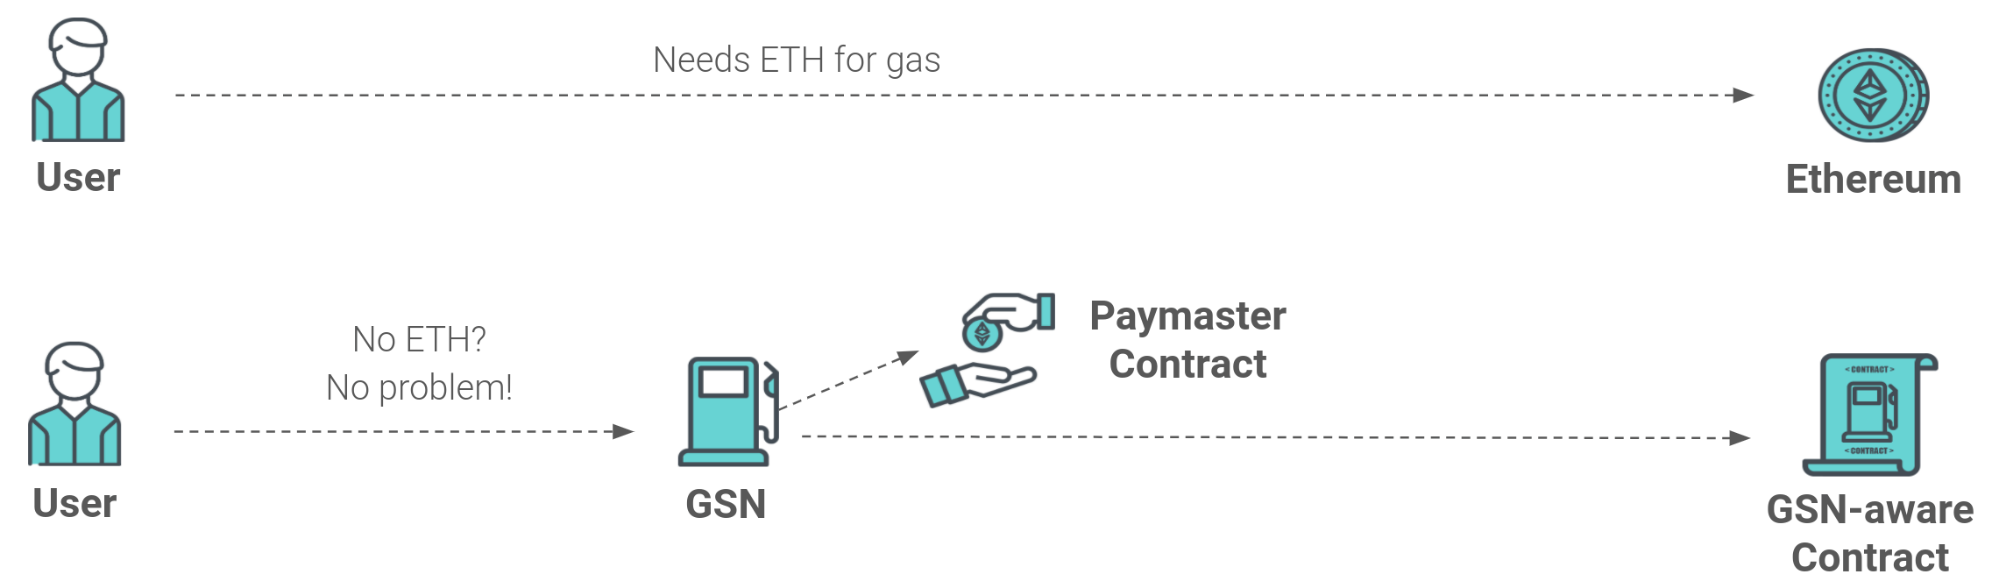
To know what relays are available you consult a special contract called RelayHub. This hub also checks up on relays and paymasters to ensure nobody is cheating.
# Creating a Paymaster
Somebody needs to pay for your users’ transactions on the blockchain. In the future it might be a commercially available service, but for now the entity most likely to pay for your users’ transactions is you. In this section you learn how to create a paymaster to accomplish this.
For the purpose of this tutorial, I am going to present a simple paymaster that accepts all requests to a specific contract, and nothing else. This can be an onboarding contract, which calls other contracts.
You can see the complete code here (opens new window). Look below for a line by line explanation.
pragma solidity ^0.6.10;
pragma experimental ABIEncoderV2;

// SPDX-License-Identifier: MIT OR Apache-2.0

import "@opengsn/contracts/src/forwarder/IForwarder.sol";
import "@opengsn/contracts/src/BasePaymaster.sol";
All paymasters inherit from BasePaymaster. That contract handles getting deposits,
ensuring functions are only called by the relay hub, and so on.
Note
This paymaster is naive because it is not a secure implementation. It can be blocked by sending enough requests to drain the account. A more sophisticated paymaster would use captcha (opens new window) or maybe hashcash (opens new window).
contract NaivePaymaster is BasePaymaster {
This variable holds the one target contract we are willing to pay for.
address public ourTarget;
When the owner sets a new target, we want to emit an event to inform the world about it.
event TargetSet(address target);
This function modifies the target contract we are willing to be a paymaster for. We
can use onlyOwner because BasePaymaster inherits from Ownable.
    function setTarget(address target) external onlyOwner {
        ourTarget = target;
        emit TargetSet(target);
    }
This is the paymaster’s most important function, the decision whether to pay for a
transaction or not. The GNSType.RelayRequest type is defined
here (opens new window).
It includes multiple fields - we’ll use the .target, which is the target contract.
The signature can be used to validate the relayRequest value.
    function preRelayedCall(
        GSNTypes.RelayRequest calldata relayRequest,
        bytes calldata signature,
The approval data is sent by the web client through the relay. It can include any data the dapp needs to decide whether to approve a request or not.
bytes calldata approvalData,
This parameter can be used, in conjunction with relayHub.calculateCharge(), to calculate
the cost a transaction would incur. Using it is beyond the scope of this basic tutorial.
uint256 maxPossibleGas
The context that the function returns is shared with the postRelayedCall method.
It is a way to share information about the call (for example, from the approval data) from the pre- to the post- method without an expensive state change.
The rejectOnRecipientRevert value that the function returns allows the Paymaster to delegate the decision to the recipient itself.
Using this feature is beyond the scope of this tutorial.
) external override returns (bytes memory context, bool rejectOnRecipientRevert) {
Verify that the forwarder is the trusted forwarder for the network.
_verifyForwarder(relayRequest);
This paymaster is naive, but not a complete sucker. It only accepts requests going to our
service. This is the way that preRelayedCall returns a rejection - either by
failing a require, by explicitly calling revert, or even just running out of gas. If we return any value from this function
normally it means that the paymaster is committed to paying for the transaction, and
will do so even if the transaction ultimately fails.
WARNING
Advanced Paymaster implementations may choose to override the getGasLimits()
method of the IPaymaster interface.
Doing so can create to a configuration where the paymaster commits to paying for a
transaction after consuming some amount of gas.
require(relayRequest.target == ourTarget);
We can return anything here, but for now we’ll just return the time. We want something we can emit with the pre- and post- processing so we’ll be able to match them when we look at the results.
Note
This is not necessary. The pre and post processing are part of the same transaction,
so we could match the pre- and post-processing using the txid. However, I wanted to have
a trivial example of using the context here.
        return (abi.encode(now), false);
    }
This function is called after the relayed call. At this point the cost of the request
is almost known (with the exception of the gas cost of postRelayedCall itself), and we can
do any accounting we need, charge entities, etc.
    function postRelayedCall(
        bytes calldata context,
        bool success,
The gasUseWithoutPost parameter provides the gas used for the transaction so far. It includes
all the gas of the transaction, except for the unknown amount we are going to use in the
postRelayedCall itself.
	uint256 gasUseWithoutPost,
        GsnTypes.RelayData calldata relayData
    ) external relayHubOnly override {
        (success, preRetVal, gasUseExceptUs, gasData);
        emit PostRelayed(abi.decode(context, (uint)));
    }
This function returns the version of the GSN protocol the paymaster supports.
In this case, the version is the latest at writing, 2.0.3.
    function versionPaymaster() external virtual view
    override returns (string memory) {
        return "2.0.3";
    }
}
# Initializing the Paymaster
It is not enough to deploy the paymaster contract. Any paymaster contract needs to
attach to a RelayHub, and if you use NaivePaymaster you also need to specify the target
for which you are willing to pay. Additionally, the paymaster is not going to help
anybody unless you actually fund it to be able to pay.
The directions below assume you are using truffle (opens new window) and that it is already configured for the network you are deploying into (either the real network or a test network).
- Run the truffle command line interface:
truffle console --network <the network you are using> - Deploy the paymaster contract, and then display the address so you can store it
somewhere for future use:If you have already deployed the contract and know the address, do this:
paymaster = await <paymaster contract>.new() paymaster.addresspaymaster = await <paymaster contract>.at(<address>) - Specify the address of
RelayHubandForwarderon the network you’re using. You can get that information here.paymaster.setRelayHub(<RelayHub address>) paymaster.setTrustedForwarder(<Forwarder address>) - Configure your paymaster. In the case of
NaivePaymaster, this means to set the target.paymaster.setTarget(<target contract address>) - Transfer ether to the paymaster’s address.
web3.eth.sendTransaction({from: accounts[0], to: paymaster.address, value: 1e18})
# The User Interface
Your contract is not going to do any good if users can’t use it. The way users interact with a contract using GSN is a bit different from the way they do it for a normal dapp, because they need to go through a relay and don't need ether.
# Using npm Packages
GSN is available as an npm package (opens new window). This means that to use it in a webapp you need to import it as a package, as if you were using Node.js (opens new window) (the server version of JavaScript) and then use a tool such as browserify (opens new window) to make your code browser-compatible. This article teaches only the basics of using these tools, for more information see here (opens new window).
These are the steps to start the development:
- Install browserify so it will be available as a script.
sudo npm install -g browserify - Create and change to a directory.
- Run this command to create the initial package definition file:
npm init -y - Install the GSN package and its dependencies:
npm install @opengsn/provider ethers - Write your code in a file, for example
index.js. - To compile the application into browser-compatible JavaScript, use this command:
browserify index.js -o bundle.js
Note
At writing there is a bug that causes the output to have some junk characters
in certain circumstances.
Under Linux you can use the tr command to solve this:
browserify index.js | tr -dc '\0-\177' > bundle.js
# The user interface code
You can see the user interface code here (opens new window). Here are the important parts (first in the JavaScript file and then on the HTML page).
Import the packages we need:
var Web3 = require( 'web3')
const gsn = require('@opengsn/provider')
const ethers = require("ethers")
This is the configuration with the addresses of the relevant contracts (on the
test network where they are deployed, Kovan) and the maximum acceptable gas price for
our messages. The address of the contract we wish to contact is conf.ourContract.
const conf = {
	ourContract: '0x10A51A94d096e746E1Aec1027A0F8deCEC43FF63',
	paymaster:   '0x3f84367c25dC11A7aBE4B9ef97AB78d5D5498bF5',
	gasPrice:  20000000000   // 20 Gwei
}
The standard is to have the wallet manager in the browser (for example, MetaMask)
expose a Web3 (opens new window)
compatible provider in window.ethereum. This provider is then wrapped by
GSN, which creates a RelayProvider that is also compatible with Web3.
Transactions are processed by GSN to allow them to go through a relay at
zero cost, but they are sent to the original wallet manager to be
signed by the user.
The ethers.js package uses its own provider class. So to create
the provider we’ll use, we take that GSN provider and use it as the
parameter to the ethers provider constructor.
        let gsnProvider = await new gsn.RelayProvider(window.ethereum, {
		forwarderAddress: conf.forwarder,
                paymasterAddress: conf.paymaster,
                verbose: false}).init()
	provider = new ethers.providers.Web3Provider(gsnProvider)
	userAddr = gsnProvider.origProvider.selectedAddress
The namespace within a file that is going to pass through browserify is inaccessible for
JavaScript written on the HTML page. By adding fields to the global variable window, we
can provide that JavaScript with a link to our functions and parameters. We don't need
all of these parameters for our program, but those we don't are useful for debugging.
window.app = {
	gsnContractCall: gsnContractCall,
	listenToEvents: listenToEvents,
	gsnPaymasterRejection: gsnPaymasterRejection,
	conf: conf,
	ethers: ethers,
	provider: provider,
	addr: flagAddr,
	abi: flagAbi
};
The HTML code loads the output of browserify, and accesses the
JavaScript functions using window.app.
# Local Tests
If you just want to run a couple of transactions to see that the dapp works you can use a test network such as Kovan, but such a network is too slow for serious testing. To do that, you run the tests locally:
# Manual Tests
- Start a local Ethereum simulator, such as ganache (opens new window).
WARNING
Due to a bug somewhere
chainIdandnetIdneed to be identical. To run ganache, use this command line:net=`date "+%j%H%M%S"` && ganache-cli --networkId $net --chainId $net -v - Make sure that the truffle configuration file (either
truffle.jsortruffle-config.js) contains the necessary information to connect to that network. - Deploy GSN (contracts and relay):
node_modules/.bin/gsn start - See the contract addresses and relay URL at the bottom of the output
GSN started RelayHub: 0xCA3ef05158d0dBD38cC7B49FbBc979d4cB977Ccc StakeManager: 0x316e9B4bBBBC9B585918CD19357fA686df636D22 Penalizer: 0xf905b7E384418de51A74758b31be97D9ef12Ab1F TrustedForwarder: 0x7Aa34e87a62378c1998f2E179EA18200faF866E7 Paymaster : 0xC264199C89a1C7056731d2a289B1A5C3fD263CbF Relay is active, URL = http://127.0.0.1:44703 . Press Ctrl-C to abort - Make sure you have the latest versions compiled and start the truffle console.
truffle compile truffle console - Get the test environment configuration
Gsn = require("@opengsn/provider") ethers = require("ethers") testEnvObj = new require('@opengsn/dev').GsnTestEnvironment testEnv = testEnvObj.loadDeployment() - Configure the paymaster, as you did earlier.
paymaster = await <paymaster contract>.new()
paymaster.setRelayHub(testEnv.relayHubAddress)
paymaster.setTrustedForwarder(testEnv.forwarderAddress)
- Fund the paymaster (it will transfer the ether to the relay hub).
paymaster.send(1e18) - Deploy the target contract and configure the paymaster. If you are using
CaptureTheFlagandNaivePaymaster, do this:flag = await CaptureTheFlag.new(testEnv.forwarderAddress) paymaster.setTarget(flag.address) - Configure the settings you need to use GSN, similar to what you did in
the user interface above, and create the
Providerobject.origProvider = web3.currentProvider conf = { paymasterAddress: paymaster.address } gsnProvider = await Gsn.RelayProvider.newProvider({provider: origProvider, config: conf}).init() provider = new ethers.providers.Web3Provider(gsnProvider) - Create an account:
acct = provider.provider.newAccount() - Create the
Contractobject:signer = provider.getSigner(acct.address, acct.privateKey) contract = await new ethers.Contract(flag.address, flag.abi, signer) - Run the transaction and wait for it to finish:
transaction = await contract.captureFlag() receipt = await provider.waitForTransaction(transaction.hash) - Get the
_tovalue from the receipt, and compare it with the account that signed the request.receipt.logs.map(entry => contract.interface.parseLog(entry))[1].values._to acct.address
# Automated tests
You can see a complete automated test here (opens new window). Here is an explanation of the new parts:
The GsnTestEnvironment.startGsn command starts GSN on the provided blockchain.
let env = await GsnTestEnvironment.startGsn('localhost')
The various addresses GSN uses on the blockchain are stored in
env.contractsDeployment. We need the trusted forwarder and the relay hub
to initialize the contracts we are testing.
const { forwarderAddress, relayHubAddress } = env.contractsDeployment
Everything else works as it in the manual tests.
# Conclusion
In this article you learned how to accept transactions from entities that can’t (or won’t) pay for them with their own gas. You also learned how to create a simple paymaster to pay for the transactions that you want to sponsor, for example those going to your own contract. You learned how to write JavaScript code that can run in the user's browser to send such free ethereum transactions, and then how to write unit tests for contracts going through GSN.
You should now be able to write your own GSN compatible dapps that users could use without having to purchase ether. Hopefully, this will make user acquisition and onboarding much less painful for the users, and therefore much more effective for you.
Original version of this tutorial by Ori Pomerantz qbzzt1@gmail.com